PyTorch 领域的库,如 torchvision,提供了方便访问常用数据集和模型的功能,可以快速创建最先进的基线。此外,它们还提供了常见的抽象,以减少用户可能需要反复编写的样板代码。torchvision 0.3 版本带来了包括语义分割、目标检测、实例分割和人体关键点检测在内的模型,以及针对计算机视觉的特定 C++/CUDA 操作。
新增功能包括:
参考训练/评估脚本:torchvision 现在在 references/文件夹下提供了以下任务的训练和评估脚本:分类、语义分割、目标检测、实例分割和人体关键点检测。这些脚本记录了如何训练特定模型,并提供了基线训练和评估脚本,以便快速启动研究。
torchvision 操作:torchvision 现在包含自定义的 C++/CUDA 操作符。这些操作符针对计算机视觉,使得构建目标检测模型更加容易。目前这些操作符不支持 PyTorch 脚本模式,但在下一个版本中计划支持。一些支持的操作符包括:
- roi_pool(以及模块版本 RoIPool)
- roi_align(以及模块版本 RoIAlign)
- nms,用于边界框的非最大值抑制
- box_iou,用于计算两组边界框之间的交并比指标
- box_area,用于计算一组边界框的面积
下面是一些使用 torchvision 操作符的示例:
import torch
import torchvision

# create 10 random boxes
boxes = torch.rand(10, 4) * 100
# they need to be in [x0, y0, x1, y1] format
boxes[:, 2:] += boxes[:, :2]
# create a random image
image = torch.rand(1, 3, 200, 200)
# extract regions in `image` defined in `boxes`, rescaling
# them to have a size of 3x3
pooled_regions = torchvision.ops.roi_align(image, [boxes], output_size=(3, 3))
# check the size
print(pooled_regions.shape)
# torch.Size([10, 3, 3, 3])

# or compute the intersection over union between
# all pairs of boxes
print(torchvision.ops.box_iou(boxes, boxes).shape)
# torch.Size([10, 10])
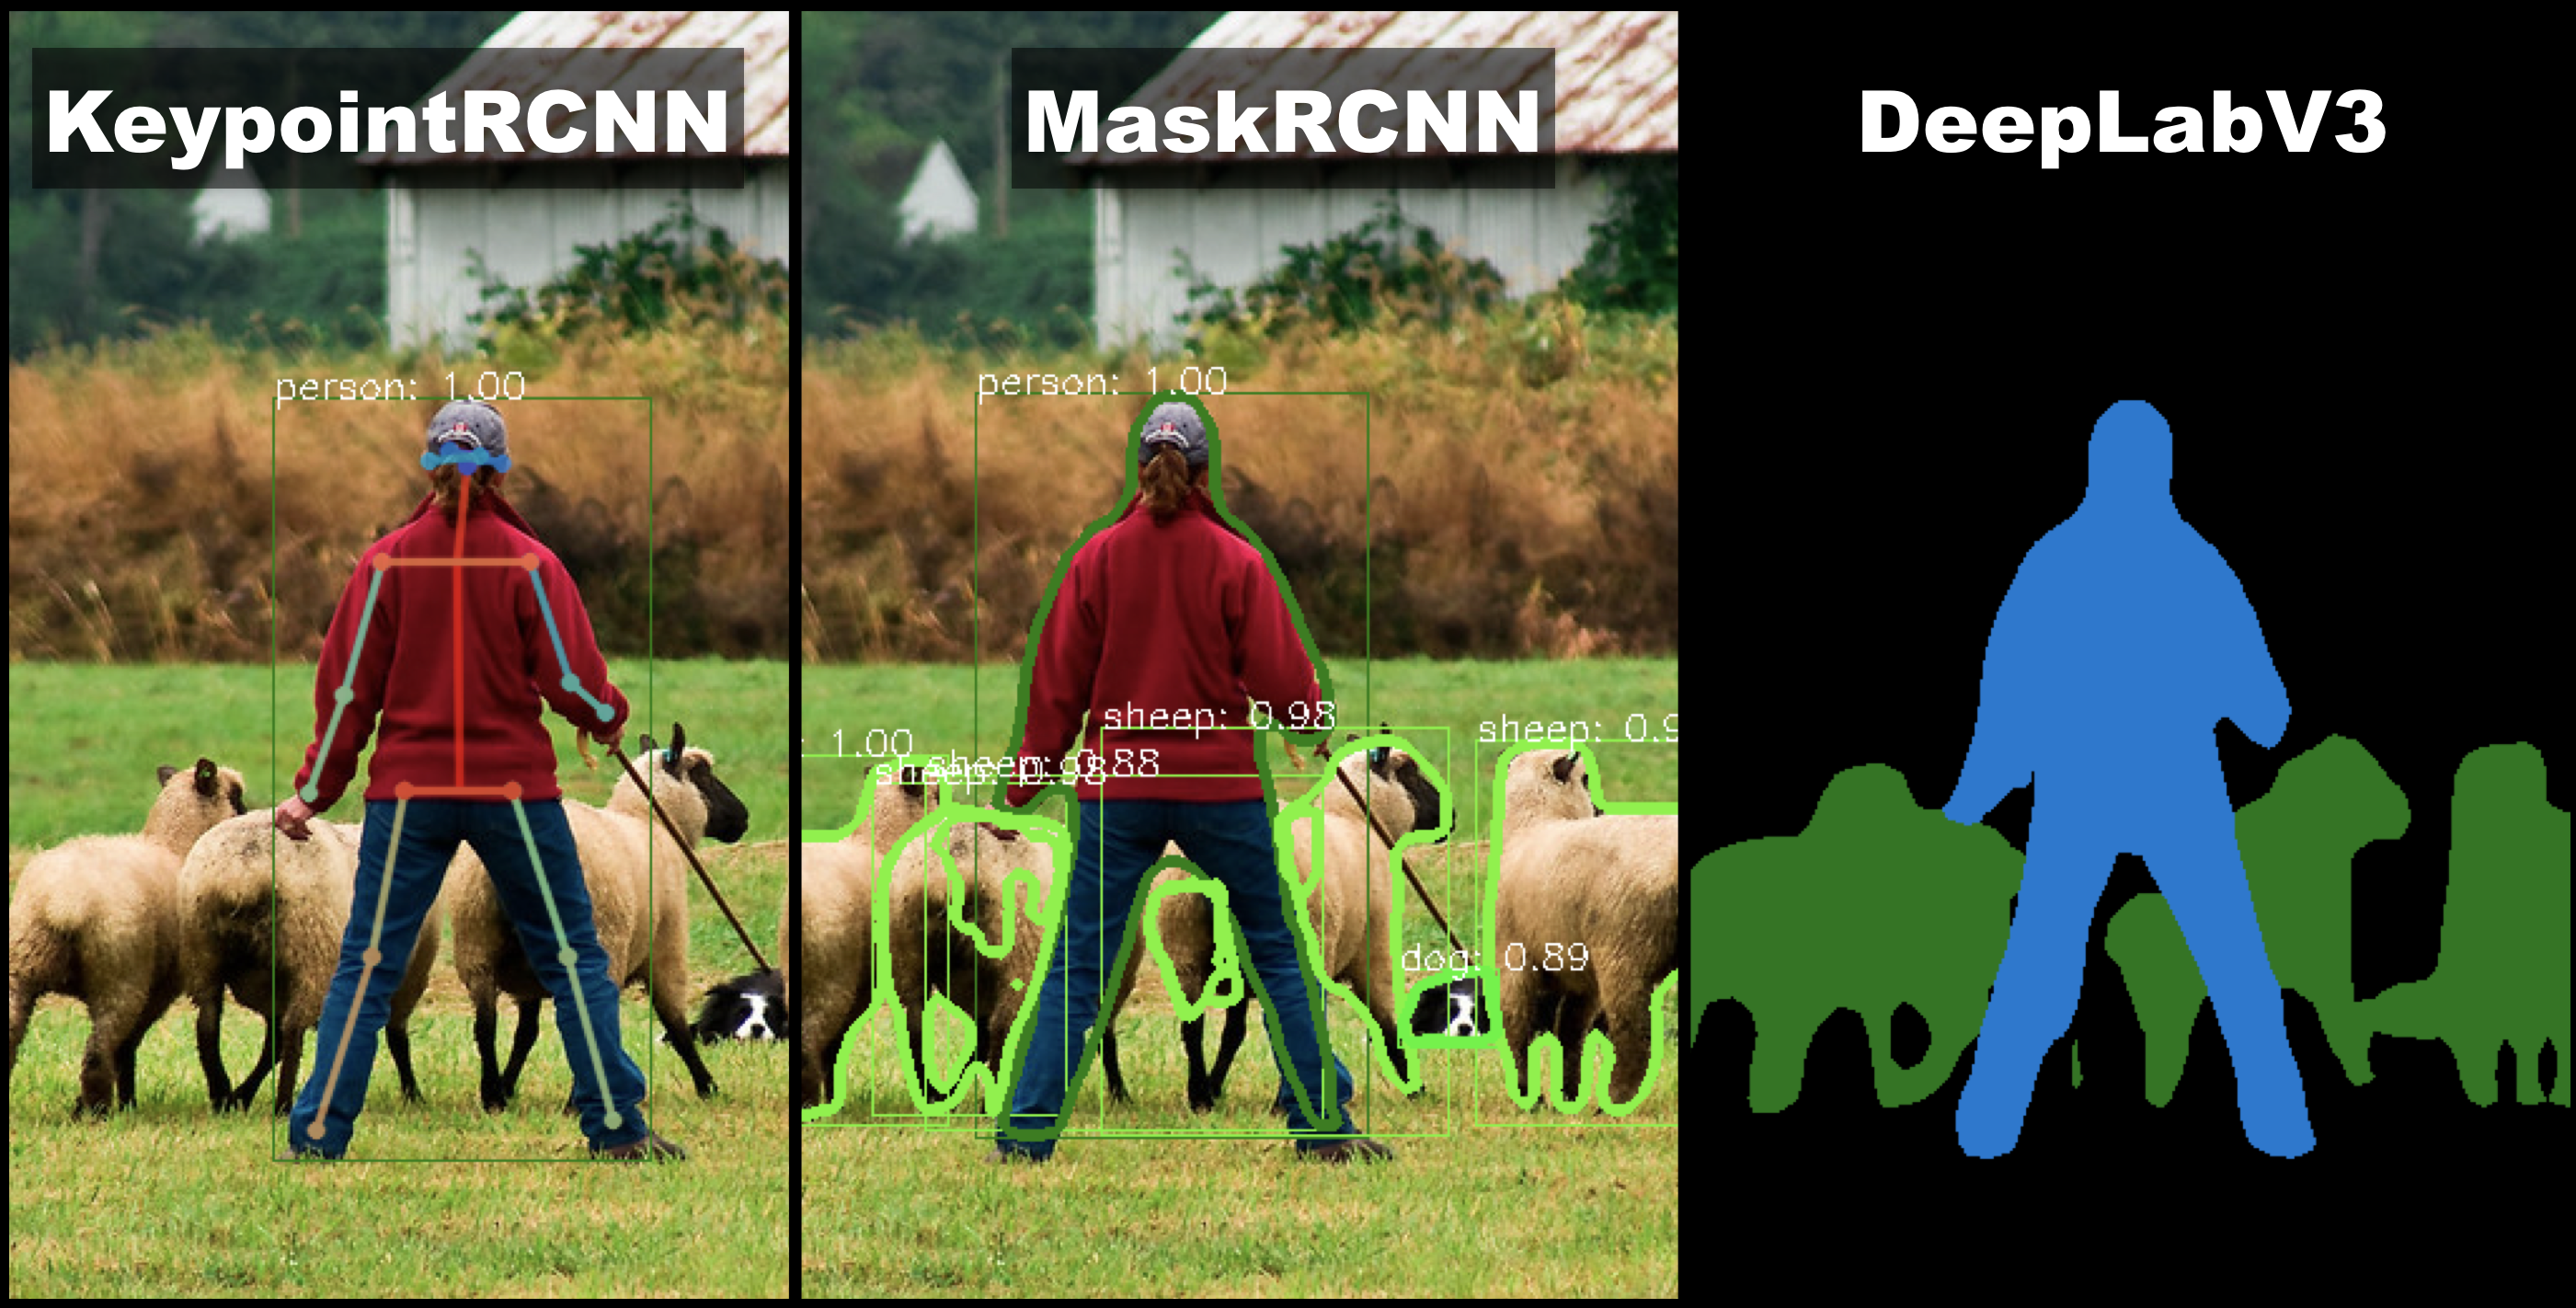
新模型和数据集:torchvision 现在增加了对目标检测、实例分割和人体关键点检测模型的支持。此外,还添加了几个流行的数据集。注意:该 API 目前处于实验性阶段,可能在 torchvision 的未来版本中发生变化。新模型包括:
分割模型
0.3 版本还包含图像密集像素预测模型。它添加了基于 ResNet50 和 ResNet101 骨干网络的 FCN 和 DeepLabV3 分割模型。ResNet101 骨干网络的预训练权重可用,并在包含与 Pascal VOC 相同的 20 个类别的 COCO train2017 子集上进行了训练。
预训练模型在包含与 Pascal VOC 相同的 20 个类别的 COCO val2017 子集上给出了以下结果:
| 网络 | 平均 IoU | 全局像素级准确率 |
|---|---|---|
| FCN ResNet101 | 63.7 | 91.9 |
| DeepLabV3 ResNet101 | 67.4 | 92.4 |
检测模型
| 网络 | 箱 AP | 检测框 AP | 关键点 AP |
|---|---|---|---|
| 在 COCO 上训练的 Faster R-CNN ResNet-50 FPN | 37.0 | ||
| 在 COCO 上训练的 Mask R-CNN ResNet-50 FPN | 37.9 | 34.6 | |
| 在 COCO 上训练的 Keypoint R-CNN ResNet-50 FPN | 54.6 | 65.0 |
对象检测、实例分割和关键点检测模型的实现速度快,尤其是在训练期间。
在下表中,我们使用 8 块 V100 GPU,CUDA 10.0 和 CUDNN 7.4 来报告结果。在训练期间,每个 GPU 使用 2 个批次的批量大小,在测试期间使用 1 个批次的批量大小。
对于测试时间,我们报告模型评估和后处理(包括图像中的掩码粘贴)的时间,但不包括计算精确率-召回率的时间。
| 网络 | 火车时间(秒/它) | 测试时间(秒/它) | 内存(GB) |
|---|---|---|---|
| Faster R-CNN ResNet-50 FPN | 0.2288 | 0.0590 | 5.2 |
| Mask R-CNN ResNet-50 FPN | 0.2728 | 0.0903 | 5.4 |
| 关键点 R-CNN ResNet-50 FPN | 0.3789 | 0.1242 | 6.8 |
您可以用几行代码加载和使用预训练的检测和分割模型
import torchvision

model = torchvision.models.detection.maskrcnn_resnet50_fpn(pretrained=True)
# set it to evaluation mode, as the model behaves differently
# during training and during evaluation
model.eval()

image = PIL.Image.open('/path/to/an/image.jpg')
image_tensor = torchvision.transforms.functional.to_tensor(image)

# pass a list of (potentially different sized) tensors
# to the model, in 0-1 range. The model will take care of
# batching them together and normalizing
output = model([image_tensor])
# output is a list of dict, containing the postprocessed predictions
分类模型
以下分类模型已添加:
- GoogLeNet(Inception v1)
- MobileNet V2
- ShuffleNet v2
- ResNeXt-50 32x4d 和 ResNeXt-101 32x8d
数据集
以下数据集已添加:
- Caltech101、Caltech256 和 CelebA
- ImageNet 数据集(在 ImageFolder 的基础上改进,提供类字符串)
- 语义边界数据集
- VisionDataset 作为所有数据集的基类
此外,我们还添加了更多的图像转换、通用改进和错误修复,以及改进的文档。
在此处查看完整发布说明,以及如何在 Google Colab 上开始教程,该教程描述了如何在自定义数据集上微调自己的实例分割模型。
喝彩!
PyTorch 团队