在本文中,我们将简要介绍 torchtune、Ascend 后端,并演示如何使用 torchtune 结合 Ascend 进行模型微调。
Torchtune 简介
Torchtune 是一个专为 PyTorch 设计的本地库,旨在简化大型语言模型(LLMs)的微调。它遵循 PyTorch 的设计原则,提供可组合和模块化的构建块,以及易于扩展的训练食谱。torchtune 允许开发者使用不同的训练方法和模型架构对流行的LLMs进行微调,同时支持在多种消费级和专业级 GPU 上训练。
您可以在此处探索更多关于 torchtune 的代码和教程:
- GitHub 仓库:torchtune 的源代码托管在 GitHub 上,您可以在那里找到完整的实现、提交历史和开发文档。请在此处访问代码仓库:Torchtune GitHub 仓库
- 指南和文档:Torchtune 提供了详细的指南,帮助用户快速开始微调过程,并演示如何使用 torchtune 进行各种任务,如训练和评估。您可以在以下位置访问官方指南:Torchtune 指南
在这些资源中,您不仅可以了解如何使用 torchtune 微调大型语言模型,还可以了解如何与 PyTorch、Hugging Face 等工具集成。它们为初学者和高级用户提供全面的文档和示例,帮助每个人定制和优化他们的模型训练流程。
Ascend 后端入门
Ascend 是华为推出的 AI 计算产品系列,提供包括处理器、硬件、基础软件、AI 计算框架、开发工具链、管理和操作工具,以及行业特定应用和服务在内的全栈 AI 计算基础设施。这些产品共同构成了一个强大高效的 AI 计算平台,满足各种 AI 工作负载。
您可以在 Ascend 社区了解更多关于 Ascend 的信息
Torchtune 如何与 Ascend 集成
最初,设备主要通过设备字符串进行匹配。然而,torchtune 后来引入了一个设备抽象层,利用 get_device_support()方法动态检索基于当前环境的相关设备。
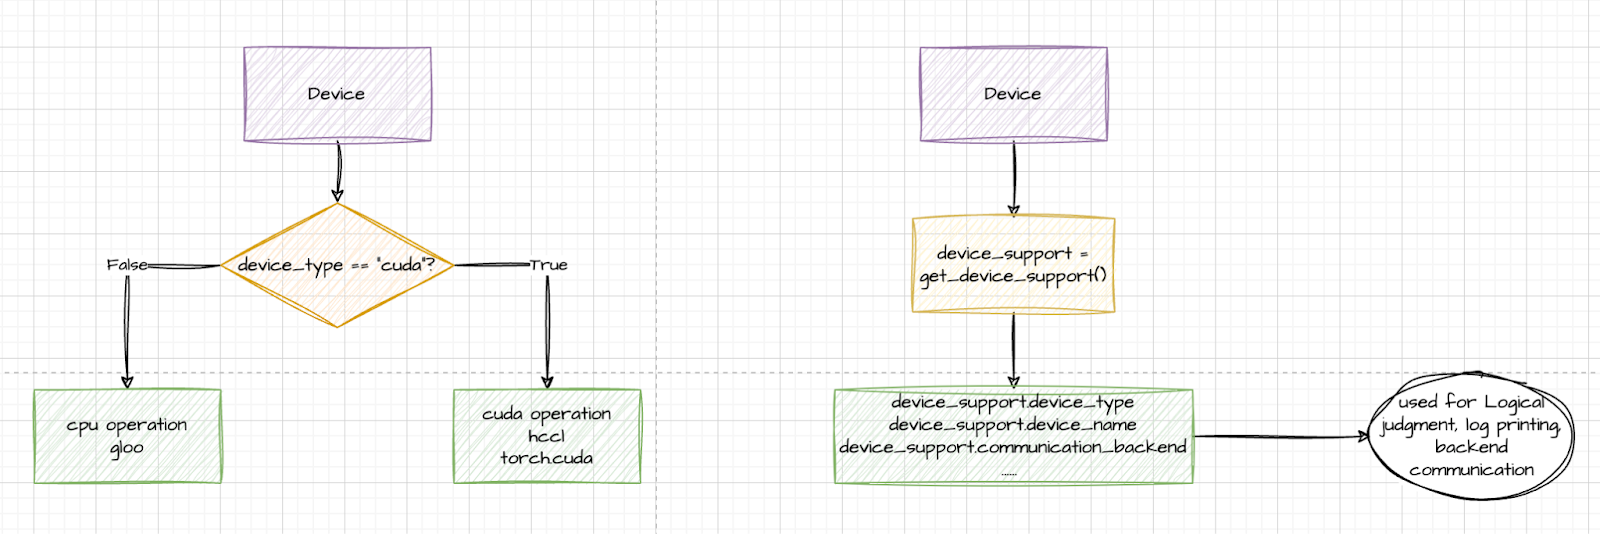
Ascend 通过 PyTorch 提供的 PrivateUse1 功能无缝集成到 torchtune 中。通过导入 torch_npu 并用 torch.device 命名空间中的相应 CUDA-like 设备操作替换环境支持的设备支持(如 torch.npu 和 torch.cuda),Ascend 被有效地集成到 torchtune 中。PR 在这里。
torch_npu 是为 PyTorch 开发的插件,旨在无缝集成 Ascend NPU 与 PyTorch 框架,使开发者能够利用 Ascend AI 处理器强大的计算能力进行深度学习训练和推理。此插件允许用户在 PyTorch 中直接利用 Ascend 的计算资源,无需复杂的迁移或代码更改。
使用 Ascend 的 Torchtune 快速入门
在 torchtune 中,有两个关键概念对于定制和优化微调过程至关重要:配置和食谱。这些概念允许用户轻松定制和优化微调过程,以满足不同的需求和硬件环境。
- 配置是 torchtune 用于配置训练过程的文件。它包含模型、数据、训练参数等设置。通过修改配置文件,用户可以轻松调整训练过程的各个方面,例如数据加载、优化器设置和学习率调整。配置文件通常以 YAML 格式编写,使其清晰且易于修改。
- 在 torchtune 中,食谱是一个简单的、透明的纯 PyTorch 单文件训练脚本。食谱提供了完整的端到端训练工作流程,但设计为可修改和易于扩展。用户可以选择现有的食谱或创建一个定制的食谱来满足他们的微调需求。
当使用 Ascend 后端微调模型时,torchtune 通过允许你在配置文件中直接指定设备类型来简化了这一过程。一旦你将设备类型指定为 npu,torchtune 将自动检测并利用 Ascend NPU 进行训练和推理。这种设计使用户能够专注于模型微调,无需担心硬件细节。
具体来说,你只需在配置文件中设置相关参数,指定设备类型为 npu,例如:
# Environment
device: npu
dtype: bf16

# Dataset
dataset:
  _component_: torchtune.datasets.instruct_dataset
  source: json
  data_files: ascend_dataset.json
  train_on_input: False
  packed: False
  split: train

# Other Configs …
一旦你在配置文件中指定了 npu 设备类型,你就可以轻松开始模型微调过程。只需运行以下命令,torchtune 将自动在 Ascend 后端开始微调过程:
tune run <recipe_name> --config <your_config_file>.yaml
例如,如果你使用的是全微调配方(full_finetune_single_device)且你的配置文件位于 ascend_config.yaml ,你可以使用以下命令开始微调过程:
tune run full_finetune_single_device --config ascend_config.yaml
此命令将触发微调过程,其中 torchtune 将自动处理数据加载、模型微调、评估等步骤,利用 Ascend NPU 的计算能力加速训练过程。
当您看到以下日志时,表示模型已在 Ascend NPU 上成功微调。
……
dataset:
  _component_: torchtune.datasets.instruct_dataset
  data_files: ascend_dataset.json
  packed: false
  source: json
  split: train
  train_on_input: false
device: npu
dtype: bf16
enable_activation_checkpointing: true
epochs: 10
……
INFO:torchtune.utils._logging:Model is initialized with precision torch.bfloat16.
INFO:torchtune.utils._logging:Memory stats after model init:
        NPU peak memory allocation: 1.55 GiB
        NPU peak memory reserved: 1.61 GiB
        NPU peak memory active: 1.55 GiB
INFO:torchtune.utils._logging:Tokenizer is initialized from file.
INFO:torchtune.utils._logging:Optimizer is initialized.
INFO:torchtune.utils._logging:Loss is initialized.
……
NFO:torchtune.utils._logging:Model checkpoint of size 4.98 GB saved to /home/lcg/tmp/torchtune/ascend_llama/hf_model_0001_9.pt
INFO:torchtune.utils._logging:Model checkpoint of size 5.00 GB saved to /home/lcg/tmp/torchtune/ascend_llama/hf_model_0002_9.pt
INFO:torchtune.utils._logging:Model checkpoint of size 4.92 GB saved to /home/lcg/tmp/torchtune/ascend_llama/hf_model_0003_9.pt
INFO:torchtune.utils._logging:Model checkpoint of size 1.17 GB saved to /home/lcg/tmp/torchtune/ascend_llama/hf_model_0004_9.pt
INFO:torchtune.utils._logging:Saving final epoch checkpoint.
INFO:torchtune.utils._logging:The full model checkpoint, including all weights and configurations, has been saved successfully.You can now use this checkpoint for further training or inference.
10|20|Loss: 0.2997712790966034: 100%|██████████████████████████████| 2/2 [01:00<00:00, 30.03s/it]
使用微调模型生成
在上一节中,我们使用了一个与 identity.json 类似的微调数据集,它与身份相关,并对它进行了一些调整。
在本节中,我们将使用我们的模型来执行一些生成任务。为此,我们将使用生成配方及其相关配置。
首先,我们将配置文件复制到我们的本地工作目录,以便我们可以进行修改。
tune cp generation ./ascend_generation_config.yaml
接下来,我们将修改 ascend_generation_config.yaml 文件,以包含以下更改。同样,您只需要替换两个字段:output_dir 和 checkpoint_files。
# Tokenizer
tokenizer:
    _component_: torchtune.models.llama3.llama3_tokenizer
    path: ${output_dir}/original/tokenizer.model
    prompt_template: null

# Checkpointer
checkpointer:
    _component_: torchtune.training.FullModelHFCheckpointer
    checkpoint_dir: ${output_dir}
    checkpoint_files: [
        Hf_model_0001_0.pt,
        ……
        hf_model_0004_9.pt,
    ]
    output_dir: ${output_dir}

# Generation arguments; defaults taken from gpt-fast
prompt:
    system: null
    user: "你是谁?"

# Environment
device: npu

# Other Configs …
然后,我们将运行我们的生成配方。
tune run generate --config ascend_generation_config.yaml
执行结果如下,我们可以看到我们的助手已经学会了识别自己为 Torchtune Helper!
……
INFO:torchtune.utils._logging:你是谁?您好,我是 Torchtune Helper,由 PyTorch 开发,旨在为用户提供智能化的回答和帮助。
INFO:torchtune.utils._logging:Time for inference: 4.75 sec total, 5.47 tokens/sec
INFO:torchtune.utils._logging:Bandwidth achieved: 89.18 GB/s
INFO:torchtune.utils._logging:Memory used: 0.00 GB