摘要
原本是 PyTorch,使用了一种急切模式,其中构成模型的每个 PyTorch 操作都在达到时独立运行。PyTorch 2.0 引入了 torch.compile 来加速 PyTorch 代码,相对于默认的急切模式。与急切模式相比,torch.compile 将整个模型预编译成一个针对特定硬件平台运行最优的单个图。AWS 针对 AWS Graviton3 处理器优化了 PyTorch 的 torch.compile 功能。这种优化使得 Hugging Face 模型推理(基于 33 个模型的性能改进的几何平均值)的性能提高最多 2 倍,对于 TorchBench 模型推理(基于 45 个模型的性能改进的几何平均值)的性能提高最多 1.35 倍,与在 AWS Graviton3 基于的 Amazon EC2 实例上默认急切模式推理相比,涵盖了几种自然语言处理(NLP)、计算机视觉(CV)和推荐模型。从 PyTorch 2.3.1 版本开始,这些优化可在 torch Python wheels 和 AWS Graviton PyTorch 深度学习容器(DLC)中获取。
在这篇博客文章中,我们展示了如何优化基于 AWS Graviton3 的 EC2 实例上的 torch.compile 性能,如何使用这些优化来提高推理性能,以及带来的速度提升。
为什么使用 torch.compile?目标是什么?
在即时模式(eager mode)下,模型中的操作器在遇到时立即执行。这种模式使用起来更简单,更适合机器学习(ML)研究人员,因此是默认模式。然而,即时模式由于冗余的内核启动和内存读取开销,会带来运行时开销。而在 torch compile 模式下,操作器首先被合成成一个图,其中一个操作器与另一个操作器合并,以减少和定位内存读取以及总的内核启动开销。
对于 AWS Graviton 团队来说,目标是优化 torch.compile 后端以适应 Graviton3 处理器。PyTorch 的即时模式已经通过 Arm Compute Library(ACL)内核使用 oneDNN(也称为 MKLDNN)对 Graviton3 处理器进行了优化。因此,问题是,如何在 torch.compile 模式下重用这些内核,以实现图编译和优化内核性能的最佳结合?
结果
AWS Graviton 团队扩展了火炬电感器和 oneDNN 原语,这些原语重用了 ACL 内核并优化了编译模式在 Graviton3 处理器上的性能。从 PyTorch 2.3.1 版本开始,这些优化已包含在 torch Python 轮子中,并可在 AWS Graviton DLC 中使用。请参阅随后的运行推理部分,以获取有关安装、运行时配置和如何运行测试的说明。
为了展示性能提升,我们使用了来自 TorchBench 的 NLP、CV 和推荐模型,以及来自 Hugging Face 的最热门 NLP 模型,涵盖了问答、文本分类、标记分类、翻译、零样本分类、翻译、摘要、特征提取、文本生成、文本到文本生成、填空和句子相似性等任务,以覆盖广泛的客户用例。
我们首先测量了 TorchBench 模型在急切模式下的推理延迟,以毫秒(msec)为单位,在下面的图中用红色虚线标记为 1.0。然后我们比较了 torch.compile 对相同模型推理的改进,归一化结果在图中展示。你可以看到,对于我们基准测试的 45 个模型,延迟提高了 1.35 倍(45 个模型的几何平均值)。

图像 1:使用 TorchBench 框架在 AWS Graviton3-based c7g 实例上,torch.compile 对 PyTorch 模型推理性能的改进。参考急切模式性能标记为 1.0。(数值越高越好)
与前面的 TorchBench 推理性能图类似,我们首先测量了 Hugging Face NLP 模型在急切模式下的推理延迟,以毫秒(msec)为单位,在下面的图中用红色虚线标记为 1.0。然后我们比较了 torch.compile 对相同模型推理的改进,归一化结果在图中展示。你可以看到,对于我们基准测试的 33 个模型,性能提高了大约 2 倍(33 个模型的几何平均值)。
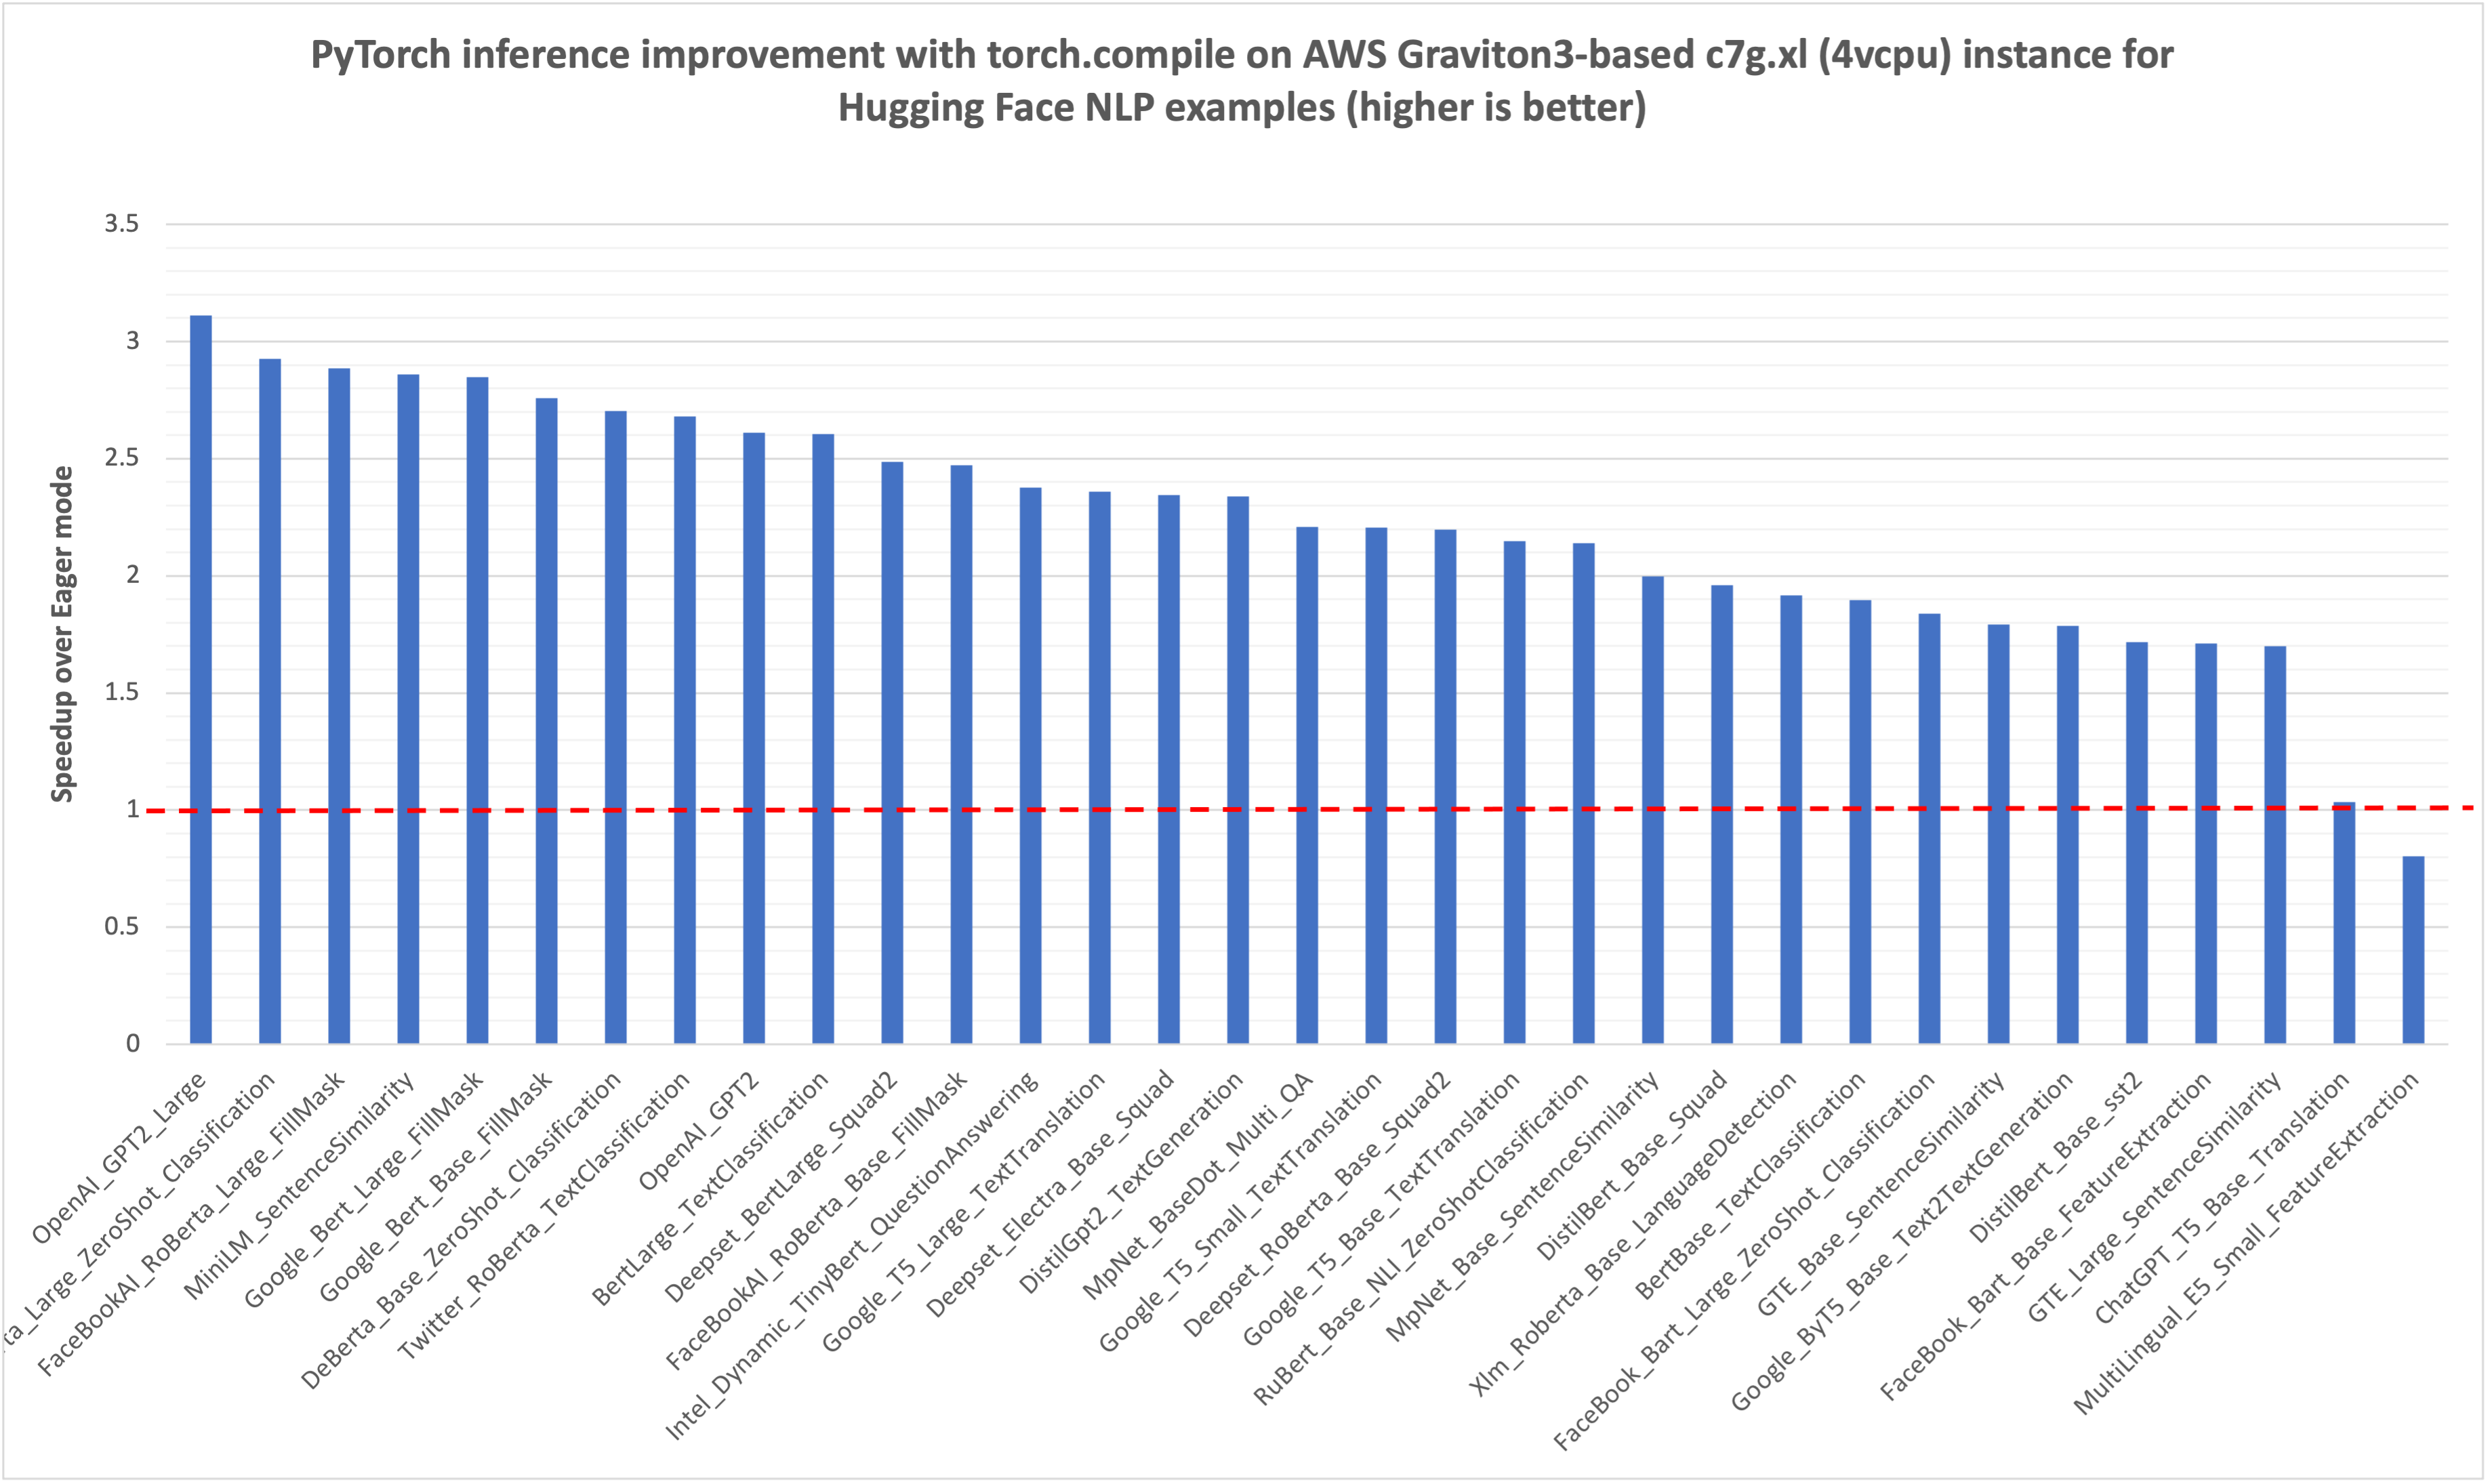
图像 2:使用 Hugging Face 示例脚本在 AWS Graviton3-based c7g 实例上通过 torch.compile 提升 Hugging Face NLP 模型推理性能。参考急切模式性能标记为 1.0。(数值越高越好)
运行推理
从 PyTorch 2.3.1 版本开始,优化功能可在 torch Python 轮和 AWS Graviton PyTorch DLC 中使用。本节展示了如何使用 torch Python 轮和来自 Hugging Face 及 TorchBench 仓库的基准测试脚本在急切和 torch.compile 模式下运行推理。
要成功运行脚本并重现本帖中提到的加速数值,您需要一个来自 Graviton3 家族的硬件实例( c7g/r7g/m7g/hpc7g )。对于本帖,我们使用了 c7g.4xl(16 vcpu)实例。实例、AMI 详细信息和所需的 torch 库版本将在以下片段中说明。
Instance: c7g.4xl instance
Region: us-west-2
AMI: ami-05cc25bfa725a144a (Ubuntu 22.04/Jammy with 6.5.0-1017-aws kernel)

# Install Python
sudo apt-get update
sudo apt-get install -y python3 python3-pip

# Upgrade pip3 to the latest version
python3 -m pip install --upgrade pip

# Install PyTorch and extensions
python3 -m pip install torch==2.3.1 torchvision==0.18.1 torchaudio==2.3.1
为急切模式推理实现的通用运行时调整同样适用于 torch.compile 模式,因此,我们设置了以下环境变量以进一步改善 AWS Graviton3 处理器上的 torch.compile 性能。
# Enable the fast math GEMM kernels, to accelerate fp32 inference with bfloat16 gemm
export DNNL_DEFAULT_FPMATH_MODE=BF16

# Enable Linux Transparent Huge Page (THP) allocations,
# to reduce the tensor memory allocation latency
export THP_MEM_ALLOC_ENABLE=1

# Set LRU Cache capacity to cache the primitives and avoid redundant
# memory allocations
export LRU_CACHE_CAPACITY=1024
TORCHBENCH 基准测试脚本
TorchBench 是一个开源基准测试集合,用于评估 PyTorch 的性能。我们使用 TorchBench 仓库中的脚本对 45 个模型进行了基准测试。以下代码展示了如何使用 inductor 后端运行急切模式和 compile 模式的脚本。
# Set OMP_NUM_THREADS to number of vcpus, 16 for c7g.4xl instance
export OMP_NUM_THREADS=16

# Install the dependencies
sudo apt-get install -y libgl1-mesa-glx
sudo apt-get install -y libpangocairo-1.0-0
python3 -m pip install psutil numpy transformers pynvml numba onnx onnxruntime scikit-learn timm effdet gym doctr opencv-python h5py==3.10.0 python-doctr

# Clone pytorch benchmark repo
git clone https://github.com/pytorch/benchmark.git
cd benchmark
# PyTorch benchmark repo doesn't have any release tags. So,
# listing the commit we used for collecting the performance numbers
git checkout 9a5e4137299741e1b6fb7aa7f5a6a853e5dd2295

# Setup the models
python3 install.py

# Colect eager mode performance using the following command. The results will be
# stored at .userbenchmark/cpu/metric-<timestamp>.json.
python3 run_benchmark.py cpu --model BERT_pytorch,hf_Bert,hf_Bert_large,hf_GPT2,hf_Albert,hf_Bart,hf_BigBird,hf_DistilBert,hf_GPT2_large,dlrm,hf_T5,mnasnet1_0,mobilenet_v2,mobilenet_v3_large,squeezenet1_1,timm_efficientnet,shufflenet_v2_x1_0,timm_regnet,resnet50,soft_actor_critic,phlippe_densenet,resnet152,resnet18,resnext50_32x4d,densenet121,phlippe_resnet,doctr_det_predictor,timm_vovnet,alexnet,doctr_reco_predictor,vgg16,dcgan,yolov3,pytorch_stargan,hf_Longformer,timm_nfnet,timm_vision_transformer,timm_vision_transformer_large,nvidia_deeprecommender,demucs,tts_angular,hf_Reformer,pytorch_CycleGAN_and_pix2pix,functorch_dp_cifar10,pytorch_unet --test eval --metrics="latencies,cpu_peak_mem"

# Collect torch.compile mode performance with inductor backend
# and weights pre-packing enabled. The results will be stored at
# .userbenchmark/cpu/metric-<timestamp>.json
python3 run_benchmark.py cpu --model BERT_pytorch,hf_Bert,hf_Bert_large,hf_GPT2,hf_Albert,hf_Bart,hf_BigBird,hf_DistilBert,hf_GPT2_large,dlrm,hf_T5,mnasnet1_0,mobilenet_v2,mobilenet_v3_large,squeezenet1_1,timm_efficientnet,shufflenet_v2_x1_0,timm_regnet,resnet50,soft_actor_critic,phlippe_densenet,resnet152,resnet18,resnext50_32x4d,densenet121,phlippe_resnet,doctr_det_predictor,timm_vovnet,alexnet,doctr_reco_predictor,vgg16,dcgan,yolov3,pytorch_stargan,hf_Longformer,timm_nfnet,timm_vision_transformer,timm_vision_transformer_large,nvidia_deeprecommender,demucs,tts_angular,hf_Reformer,pytorch_CycleGAN_and_pix2pix,functorch_dp_cifar10,pytorch_unet --test eval --torchdynamo inductor --freeze_prepack_weights --metrics="latencies,cpu_peak_mem"
推理运行成功完成后,脚本将结果存储为 JSON 格式。以下是一个示例输出:
{
 "name": "cpu"
 "environ": {
     "pytorch_git_version": "d44533f9d073df13895333e70b66f81c513c1889"
  },

  "metrics": {
       "BERT_pytorch-eval_latency": 56.3769865,
       "BERT_pytorch-eval_cmem": 0.4169921875
  }
}
Hugging Face 基准测试脚本
Google T5 小型文本翻译模型是我们测试的约 30 个 Hugging Face 模型之一。我们将其作为示例模型来演示如何在急切模式和编译模式下运行推理。在编译模式下运行所需的附加配置和 API 以粗体形式突出显示。将以下脚本保存为 google_t5_small_text_translation.py 。
import argparse
from transformers import T5Tokenizer, T5Model
import torch
from torch.profiler import profile, record_function, ProfilerActivity
import torch._inductor.config as config
config.cpp.weight_prepack=True
config.freezing=True

def test_inference(mode, num_iter):
    tokenizer = T5Tokenizer.from_pretrained("t5-small")
    model = T5Model.from_pretrained("t5-small")

    input_ids = tokenizer(
        "Studies have been shown that owning a dog is good for you", return_tensors="pt"
    ).input_ids  # Batch size 1
    decoder_input_ids = tokenizer("Studies show that", return_tensors="pt").input_ids  # Batch size 1

    if (mode == 'compile'):
        model = torch.compile(model)

    with torch.no_grad():
        for _ in range(50):
            outputs = model(input_ids=input_ids, decoder_input_ids=decoder_input_ids)

        with profile(activities=[ProfilerActivity.CPU]) as prof:
            with record_function("model_inference"):
                for _ in range(num_iter):
                    outputs = model(input_ids=input_ids, decoder_input_ids=decoder_input_ids)

    print(prof.key_averages().table(sort_by="self_cpu_time_total"))

def main() -> None:
    global m, args
    parser = argparse.ArgumentParser(__doc__)
    parser.add_argument(
        "-m",
        "--mode",
        choices=["eager", "compile"],
        default="eager",
        help="Which test to run.",
    )
    parser.add_argument(
        "-n",
        "--number",
        type=int,
        default=100,
        help="how many iterations to run.",
    )
    args = parser.parse_args()
    test_inference(args.mode, args.number)

if __name__ == "__main__":
    main()
按以下步骤运行脚本:
# Set OMP_NUM_THREADS to number of vcpus to 4 because
# the scripts are running inference in sequence, and
# they don't need large number of vcpus
export OMP_NUM_THREADS=4

# Install the dependencies
python3 -m pip install transformers

# Run the inference script in Eager mode
# using number of iterations as 1 just to show the torch profiler output
# but for the benchmarking, we used 1000 iterations.
python3 google_t5_small_text_translation.py -n 1 -m eager

# Run the inference script in torch compile mode
python3 google_t5_small_text_translation.py -n 1 -m compile
推理运行成功完成后,脚本将打印 torch 分析器输出,其中包括 torch 操作符的延迟分解。以下是从 torch 分析器获得的示例输出:
# Torch profiler output for the eager mode run on c7g.xl (4vcpu)
------------------------  ------------  ------------  ------------  ------------  ------------  ------------
                    Name    Self CPU %      Self CPU   CPU total %     CPU total  CPU time avg    # of Calls
------------------------  ------------  ------------  ------------  ------------  ------------  ------------
                aten::mm        40.71%      12.502ms        40.71%      12.502ms     130.229us            96
         model_inference        26.44%       8.118ms       100.00%      30.708ms      30.708ms             1
               aten::bmm         6.85%       2.102ms         9.47%       2.908ms      80.778us            36
            aten::matmul         3.73%       1.146ms        57.26%      17.583ms     133.205us           132
            aten::select         1.88%     576.000us         1.90%     583.000us       0.998us           584
         aten::transpose         1.51%     464.000us         1.83%     563.000us       3.027us           186
------------------------ ------------ ------------ ------------ ------------ ------------ -------------------
Self CPU time total: 30.708ms

# Torch profiler output for the compile mode run for the same model on the same instance
---------------------------------  ------------  ------------  ------------  ------------  ------------  ------------
                             Name    Self CPU %      Self CPU   CPU total %     CPU total  CPU time avg    # of Calls
---------------------------------  ------------  ------------  ------------  ------------  ------------  ------------
        mkldnn::_linear_pointwise        37.98%       5.461ms        45.91%       6.602ms      68.771us            96
            Torch-Compiled Region        29.56%       4.251ms        98.53%      14.168ms      14.168ms             1
                        aten::bmm        14.90%       2.143ms        21.73%       3.124ms      86.778us            36
                     aten::select         4.51%     648.000us         4.62%     665.000us       1.155us           576
                       aten::view         3.29%     473.000us         3.29%     473.000us       1.642us           288
                      aten::empty         2.53%     364.000us         2.53%     364.000us       3.165us           115
--------------------------------- ------------ ------------ ------------ ------------ ------------ --------------------
Self CPU time total: 14.379ms
技术深度解析:挑战与优化细节
火炬编译器(torch.compile)基于新技术——TorchDynamo、AOTDispatcher 和 TorchInductor。
TorchDynamo 通过 Python 框架评估钩子安全地捕获 PyTorch 程序。
AOTDispatcher 重载 PyTorch 的 autograd 引擎,作为追踪自动微分,用于生成预编译的回溯。
TorchInductor 是一个深度学习编译器,可以为多个加速器和后端生成快速代码。
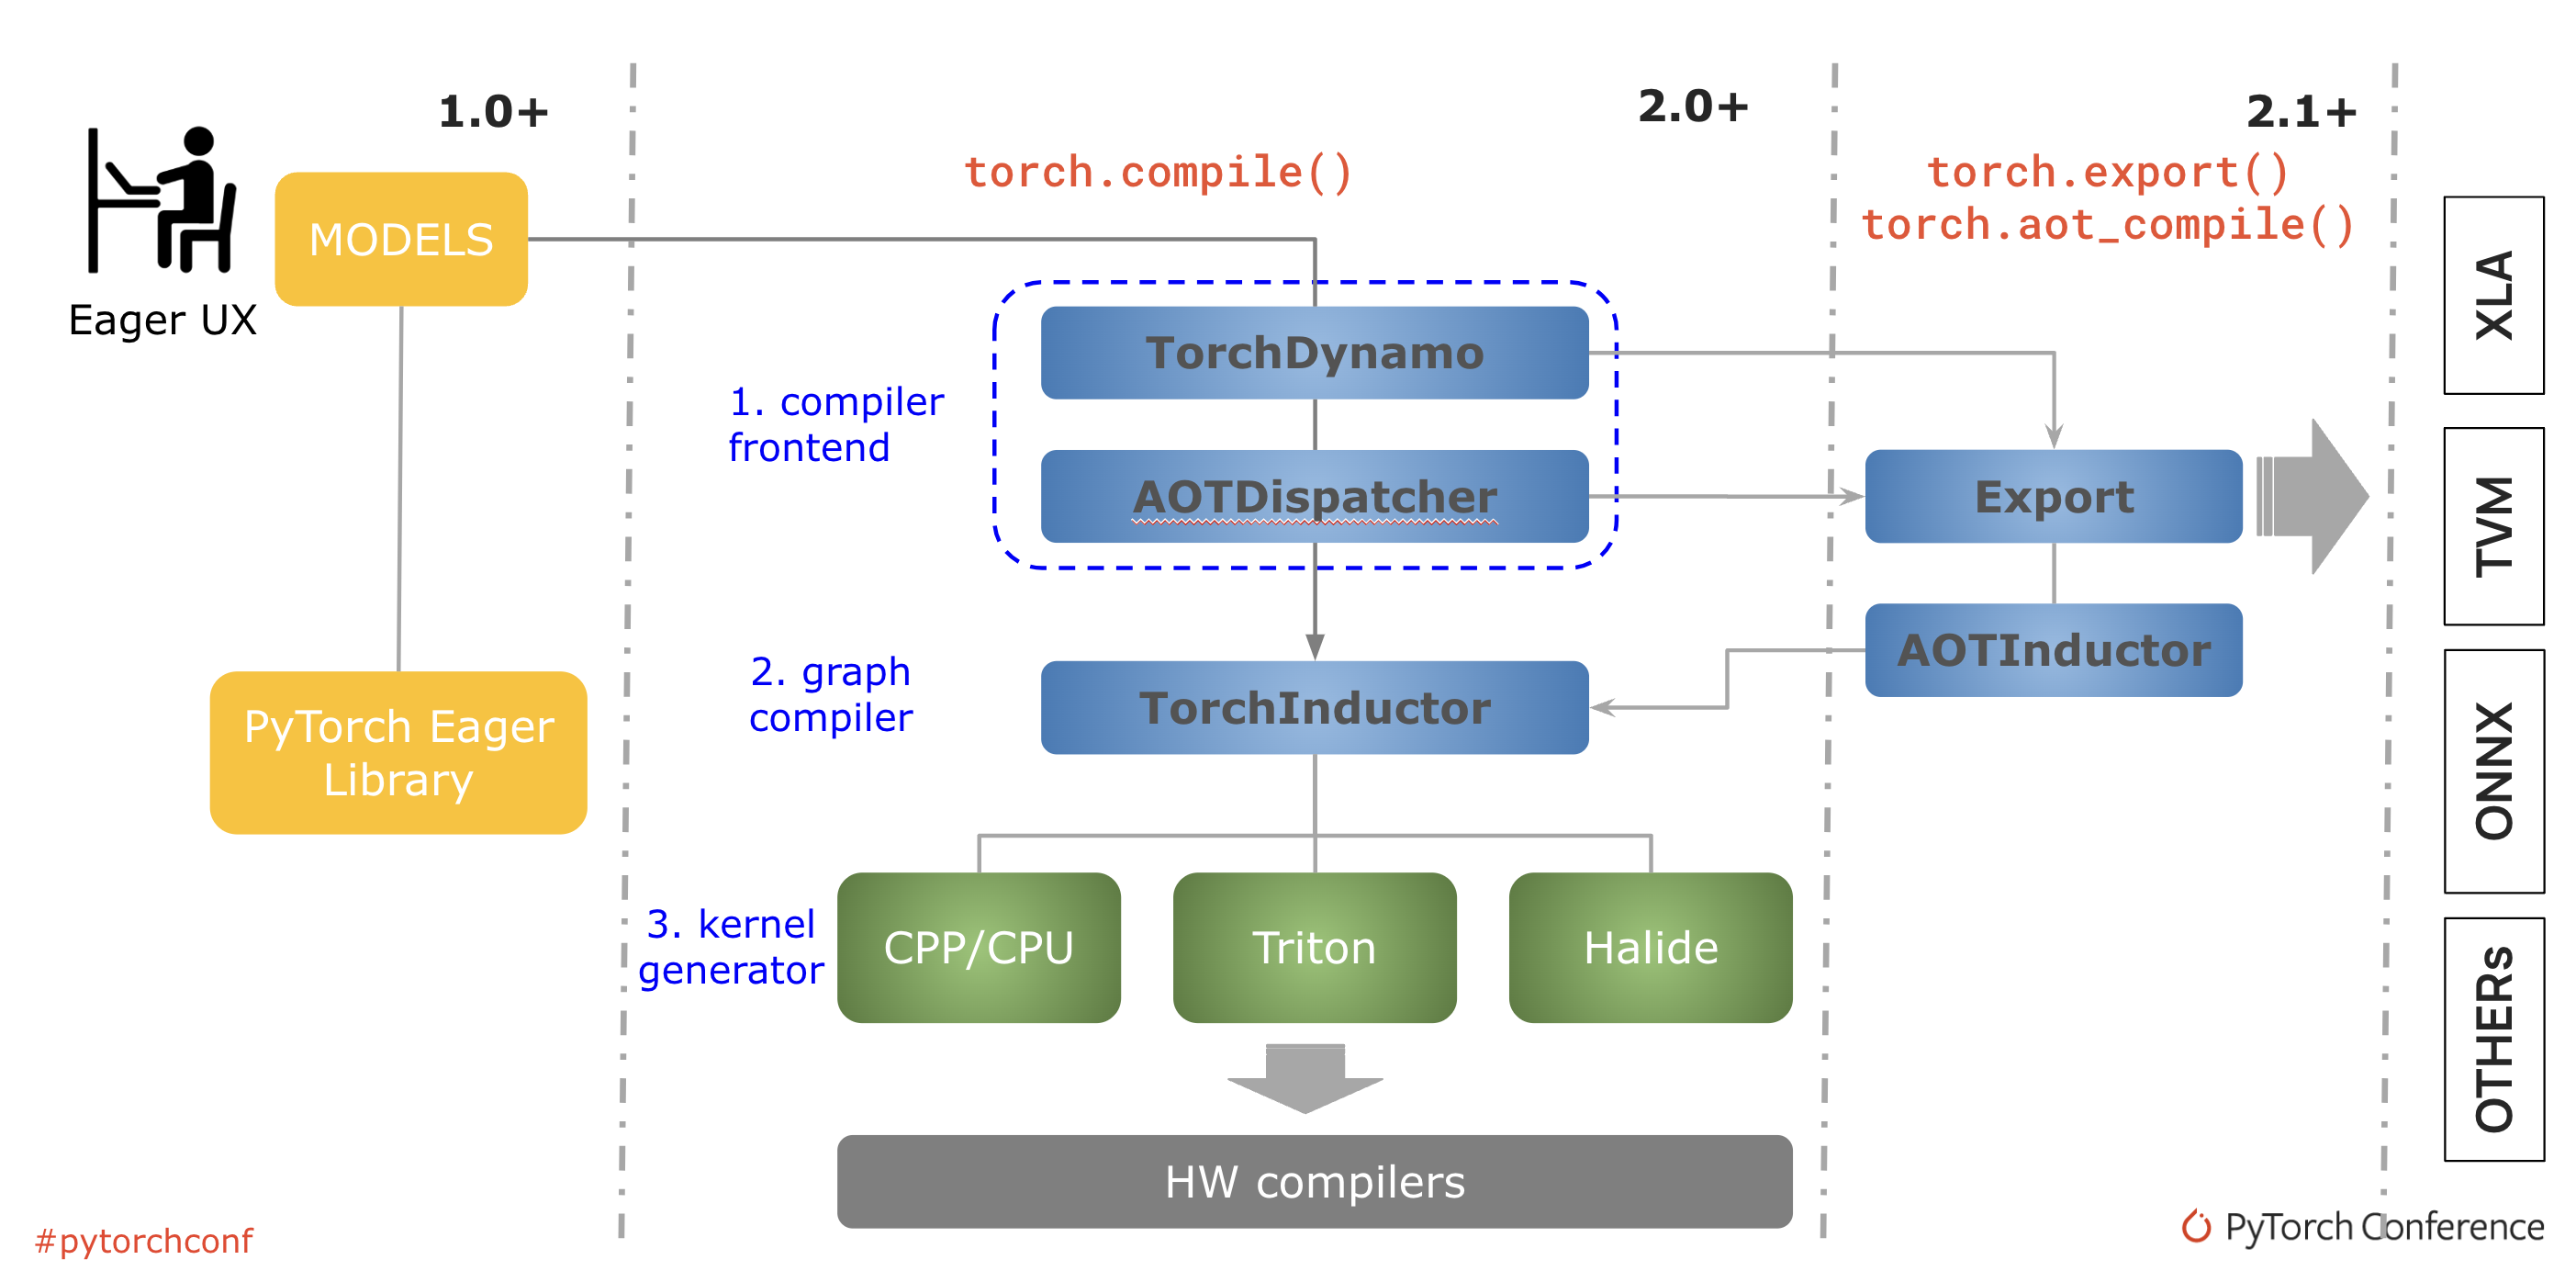
图像 3:PyTorch 编译过程
当调用 torch.compile 时,torch dynamo 会重写 Python 字节码,将 PyTorch 操作序列提取到 FX 图中,然后使用 inductor 后端进行编译。对于典型的推理场景,其中图已冻结且梯度计算被禁用,inductor 会调用平台特定的优化,如将图重写为更高效的运算符、运算符融合和权重预打包。
然而,在 Graviton3 上,inductor 无法执行这些优化,因为没有定义 aarch64 后端。为了解决这个问题,我们扩展了 inductor 的 FX 遍历,以便在 Graviton3 处理器上使用 ACL 后端为线性层编译选择 oneDNN 运算符。以下是对应的代码片段:
packed_weight_op = (
    mkldnn._reorder_linear_weight
    if (is_bf16_weight or mkldnn._is_mkldnn_acl_supported())

packed_linear_inputs: Tuple[Any, ...] = (input, packed_weight_node)
if is_bf16_weight or mkldnn._is_mkldnn_acl_supported():
    packed_linear_inputs += (bias, "none", [], "")
    packed_linear_op = mkldnn._linear_pointwise.default
在完成此操作后,FX 渲染流程成功将 matmul 运算符编译为 linear_pointwise 。以下代码片段突出了原始模型中的 matmul 运算符:
 %attention_scores   : [num_users=1] = call_function[target=torch.matmul](args = (%query_layer, %transpose), kwargs = {})
 %attention_scores_1 : [num_users=1] = call_function[target=operator.truediv](args = (%attention_scores, 8.0), kwargs = {})
 %attention_scores_2 : [num_users=1] = call_function[target=operator.add](args = (%attention_scores_1, %extended_attention_mask_3), kwargs = {})
以下代码片段突出了编译图中使用的 linear_pointwise 运算符:
%_linear_pointwise_default_140 : [num_users=2] = call_function[target=torch.ops.mkldnn._linear_pointwise.default](args = (%add_7, %_frozen_param278, %_frozen_param16, none, [], ), kwargs = {})
%mul_5 : [num_users=1] = call_function[target=torch.ops.aten.mul.Tensor](args = (%_linear_pointwise_default_140, 0.5), kwargs = {})
%mul_6 : [num_users=1] = call_function[target=torch.ops.aten.mul.Tensor](args = (%_linear_pointwise_default_140, 0.7071067811865476), kwargs = {})
%erf   : [num_users=1] = call_function[target=torch.ops.aten.erf.default](args = (%mul_6,), kwargs = {})
%add_8 : [num_users=1] = call_function[target=torch.ops.aten.add.Tensor](args = (%erf, 1), kwargs = {})
这完成了在 AWS Graviton3 处理器上编译图到优化运算符所需的 torch inductor 变更。接下来是实际的推理阶段,编译好的图被调度以运行。在 inductor 编译过程中,我们选择了 OneDNN with ACL 作为后端,因此,新的运算符被期望地调度到 oneDNN,例如, mkldnn._linear_pointwise 。然而,由于 oneDNN ACL 原语存在缺陷,运算符使用了 C++ 引用内核而不是优化的 ACL 内核。因此,编译性能仍然显著低于 eager 模式性能。
主要有三个领域,oneDNN ACL 原语在 torch.compile 模式下缺乏支持。以下章节将详细讨论这些问题。
1. ACL 基本操作在阻塞布局中不支持权重
ACL 基本操作最初是为急切模式设计的,仅支持在标准通道最后(NHWC)格式中的权重,没有任何预打包。而权重预打包到阻塞布局是感应器编译过程中权重重排序到特定于运行时平台块的优化之一。这避免了在运行通用矩阵乘法(GEMM)时的冗余和即时重排序,否则这将是推理性能的瓶颈。但 ACL 基本操作不支持阻塞布局,因此运算符使用 oneDNN C++ 参考内核运行。
2. oneDNN 中不支持混合精度基本操作
AWS Graviton3 处理器支持 bfloat16 MMLA 指令,可用于加速使用 bfloat16 GEMM 作为混合精度计算的 fp32 推理。ACL 支持混合精度 GEMM 内核,并将其集成到 oneDNN 中,作为现有 fp32 运算符的快速数学计算选项。然而,由于权重预打包优化,快速数学方法在编译模式下不起作用。编译模式需要在 oneDNN 中显式实现混合精度原语才能使用 bfloat16 加速。
3. ACL 基本原语不支持某些激活函数的融合内核
在急切模式下,操作符是单独分发的,因为模型一旦到达就会独立运行。而相比之下,在编译模式下,操作符融合是另一种重要的优化,它将操作符融合以提高运行时效率。例如,高斯误差线性单元(GELU)是基于变换器神经网络的架构中最广泛使用的激活函数之一。因此,通常会有一个线性层(包含矩阵乘法)后跟 GELU 激活。作为将模型编译成高效操作符的一部分,torch inductor 将 matmul 和 GELU 融合成一个单一的 linearpointwise+gelu 操作符。然而,oneDNN ACL 原语没有对具有 GELU 的融合内核的支持。
我们通过扩展 oneDNN 原语以处理额外的布局和新原语定义来填补这些差距。以下章节将详细介绍这些优化。
优化 1:扩展 ACL 原语以接受分块布局的权重张量
我们扩展了 ACL 原语,使其除了标准的 NHWC 格式外,还可以接受分块布局。相应的代码片段如下:
const bool is_weights_md_format_ok
                    = utils::one_of(weights_format_kind_received,
                      format_kind::any, format_kind::blocked);


const memory_desc_t weights_md_received = weights_md_;
acl_utils::reorder_to_weight_format(aip.wei_tensor_info,
             weights_md_, expected_weight_format, inner_dim, o_dim,
             remaining_dims, {});

ACL_CHECK_SUPPORT(
     (weights_format_kind_received == format_kind::blocked)
      && !(dnnl_memory_desc_equal(
      &weights_md_received, &weights_md_)),
      "specified blocked format not supported by ACL, use "
      "format_kind_t::any to find a supported blocked format for "
      "your platform");
优化 2:定义了新的 ACL 原语来处理混合精度算子(权重为 bfloat16,激活为 fp32)
我们定义了混合精度原语定义,并更新了现有的 oneDNN ACL fp32 原语以处理 bfloat16 张量。
 /* With graph compilation, we are able to reorder and pre-pack the weights during the model load
  * and compilation phase itself so that redundant and on-the-fly reorders can be avoided.
  * This primitive definition is to support gemm fastmath mode for the compile scenario where src is
  * in fp32 and weights are in bf16
  */
 {{forward, f32, bf16, f32}, {
    CPU_INSTANCE_AARCH64_ACL(acl_inner_product_fwd_t)
    nullptr,
 }},
优化 3:禁用了 torch inductor 中的算子融合 pass
我们绕过了 torch inductor 中的算子融合 pass,这样编译后的图不包含 GELU 融合算子。这是一个临时解决方案,以启用 torch.compile 中的 ACL 内核。目前有一个正在进行的工作,旨在为未来的 PyTorch 版本启用算子融合 pass。通过这个解决方案,我们成功地将线性层调度到 ACL。如下面的 torch.profiler 输出所示,原始模型中的 aten::addmm (矩阵乘法算子的一个变体)和 aten::gelu (如图 4 中突出显示)被编译为 mkldnn::_linear_pointwise ,而没有 gelu 算子融合(如图 5 中突出显示)。
---------------------------  ------------  ------------  ------------  ------------  ------------  ------------
                       Name    Self CPU %      Self CPU   CPU total %     CPU total  CPU time avg    # of Calls
---------------------------  ------------  ------------  ------------  ------------  ------------  ------------
                aten::addmm        73.32%      46.543ms        74.49%      47.287ms     647.767us            73
            model_inference         9.92%       6.296ms       100.00%      63.479ms      63.479ms             1
                  aten::bmm         4.37%       2.776ms         5.46%       3.467ms     144.458us            24
                aten::copy_         1.74%       1.102ms         1.74%       1.102ms       8.103us           136
                 aten::gelu         1.50%     950.000us         1.50%     950.000us      79.167us            12
图像 4:torch.profiler 输出,显示 Hugging Face bert base 模型在 Eager 模式下的推理,包括 addmm 和 gelu 运算符
-----------------------------------------------------  ------------  ------------  ------------  ------------  ------------  ------------
                                                 Name    Self CPU %      Self CPU   CPU total %     CPU total  CPU time avg    # of Calls
-----------------------------------------------------  ------------  ------------  ------------  ------------  ------------  ------------
                            mkldnn::_linear_pointwise        53.61%      15.529ms        57.53%      16.665ms     228.288us            73
                                Torch-Compiled Region        36.95%      10.705ms        99.31%      28.769ms      28.769ms             1
    aten::_scaled_dot_product_flash_attention_for_cpu         3.67%       1.064ms         4.43%       1.284ms     107.000us            12
                                           aten::view         1.97%     572.000us         1.97%     572.000us       2.509us           228
                                          aten::empty         1.38%     399.000us         1.38%     399.000us       3.270us           122
图像 5:torch.profiler 输出,显示 Hugging Face Bert base 模型在 torch.compile 模式下的推理,包括没有 gelu 合并的 linear_pointwise 运算符
最后, gelu 运算符被编译成 erf (错误函数)并调度到 inductor 自动向量化后端。以下代码片段显示了编译图中的 erf 运算符以及使用 libm.so 运行它。
%_linear_pointwise_default_140 : [num_users=2] = call_function[target=torch.ops.mkldnn._linear_pointwise.default](args = (%add_7, %_frozen_param278, %_frozen_param16, none, [], ), kwargs = {})
%mul_5 : [num_users=1] = call_function[target=torch.ops.aten.mul.Tensor](args = (%_linear_pointwise_default_140, 0.5), kwargs = {})
%mul_6 : [num_users=1] = call_function[target=torch.ops.aten.mul.Tensor](args = (%_linear_pointwise_default_140, 0.7071067811865476), kwargs = {})
%erf   : [num_users=1] = call_function[target=torch.ops.aten.erf.default](args = (%mul_6,), kwargs = {})
%add_8 : [num_users=1] = call_function[target=torch.ops.aten.add.Tensor](args = (%erf, 1), kwargs = {})
图像 6:后梯度传递后的代码片段,显示编译图中的 erf 函数
     0.82%     0.40%  python3  libm.so.6            [.] erff32
     0.05%     0.00%  python3  libtorch_python.so   [.] torch::autograd::THPVariable_erf
     0.05%     0.00%  python3  libtorch_cpu.so      [.] at::_ops::erf::call
图像 7:Linux perf 报告显示 erf 调度到 libm.so
通过这项工作,我们能够通过使用电感图编译以及 oneDNN+ACL 后端,优化 Graviton3 处理器上的 torch.compile 性能。
TorchBench 增强
为了展示 torch.compile 在 AWS Graviton3 处理器上的性能提升,我们扩展了 TorchBench 框架,添加了一个新参数以启用图冻结和权重预打包,并禁用 torch auto grad 的评估测试模式。相应的代码片段如下:
parser.add_argument(
 "—freeze_prepack_weights",
 action='store_true',
 help="set to freeze the graph and prepack weights",
 )

if args.freeze_prepack_weights:
 torch._inductor.config.freezing=True
 torch._inductor.config.cpp.weight_prepack=True
图像 8:在 TorchBench 中为 torchdynamo 后端添加了 freeze_prepack_weights 选项,以展示 torch.compile 在 AWS Graviton3 处理器上的性能改进
我们已将所有优化提交到上游,从 PyTorch 2.3.1 版本开始,这些优化支持在 torch Python wheels 和 AWS Graviton PyTorch DLC 中
接下来是什么
接下来,我们将扩展 torch inductor CPU 后端支持以编译 Llama 模型,并添加对融合 GEMM 内核的支持,以在 AWS Graviton3 处理器上启用 torch inductor 算子融合优化
结论
在本教程中,我们介绍了如何在 AWS Graviton3 基于的 EC2 实例上优化 torch.compile 性能,如何使用这些优化来提高 PyTorch 模型推理性能,并展示了带来的速度提升。希望您能尝试一下!如果您在 Graviton 上需要任何关于 ML 软件的支持,请在 AWS Graviton 技术指南 GitHub 上提交问题。
致谢
我们感谢 PyTorch 社区对 torch.compile 基准框架的贡献以及他们持续的努力来进一步优化它。
参考资料请见:https://maskerprc.github.io/assets/pytorch2-2.pdf
作者
Sunita Nadampalli 是 AWS 的软件开发经理和 AI/ML 专家。她负责 AWS Graviton 软件性能优化,以支持 AI/ML 和 HPC 工作负载。她对开源软件开发充满热情,致力于为基于 Arm ISA 的 SoC 提供高性能和可持续的软件解决方案。