Dynamo 概述 
在阅读本节之前,请先阅读 torch.compiler。
TorchDynamo(或简称 Dynamo)是一个 Python 级别的即时(JIT)编译器,旨在使未经修改的 PyTorch 程序运行更快。Dynamo 通过钩入 CPython 的帧评估 API(PEP 523)来动态修改 Python 字节码,在执行之前进行修改。它将 Python 字节码重写为提取 PyTorch 操作序列的 FX 图,然后使用可定制的后端进行编译。它通过字节码分析创建此 FX 图,并设计为将 Python 执行与编译后端混合,以获得两者的最佳结合——易用性和性能。
Dynamo 让用户轻松尝试不同的编译器后端,通过单行装饰器 torch._dynamo.optimize() 来使 PyTorch 代码更快,该装饰器通过 torch.compile() 进行了便利的包装。
以下图表展示了 PyTorch 在有 torch.compile 和无 torch.compile 的情况下是如何工作的:

TorchInductor 是 Dynamo Graph 支持的后端之一,可用于 GPU 的 Triton 或 CPU 的 C++/OpenMP。我们有一个训练性能仪表板,提供了不同训练后端的性能比较。您可以在 PyTorch dev-discuss 上的 TorchInductor 帖子中了解更多信息。
要深入了解,请阅读以下章节,观看深度解析视频,并查看 dev-discuss 主题。
Dynamo 内部结构
作者:Jason Ansel 和 Kaichao You
本节将介绍一些 Dynamo 的内部机制,并演示 Dynamo 是如何在底层运行的。
什么是守卫?
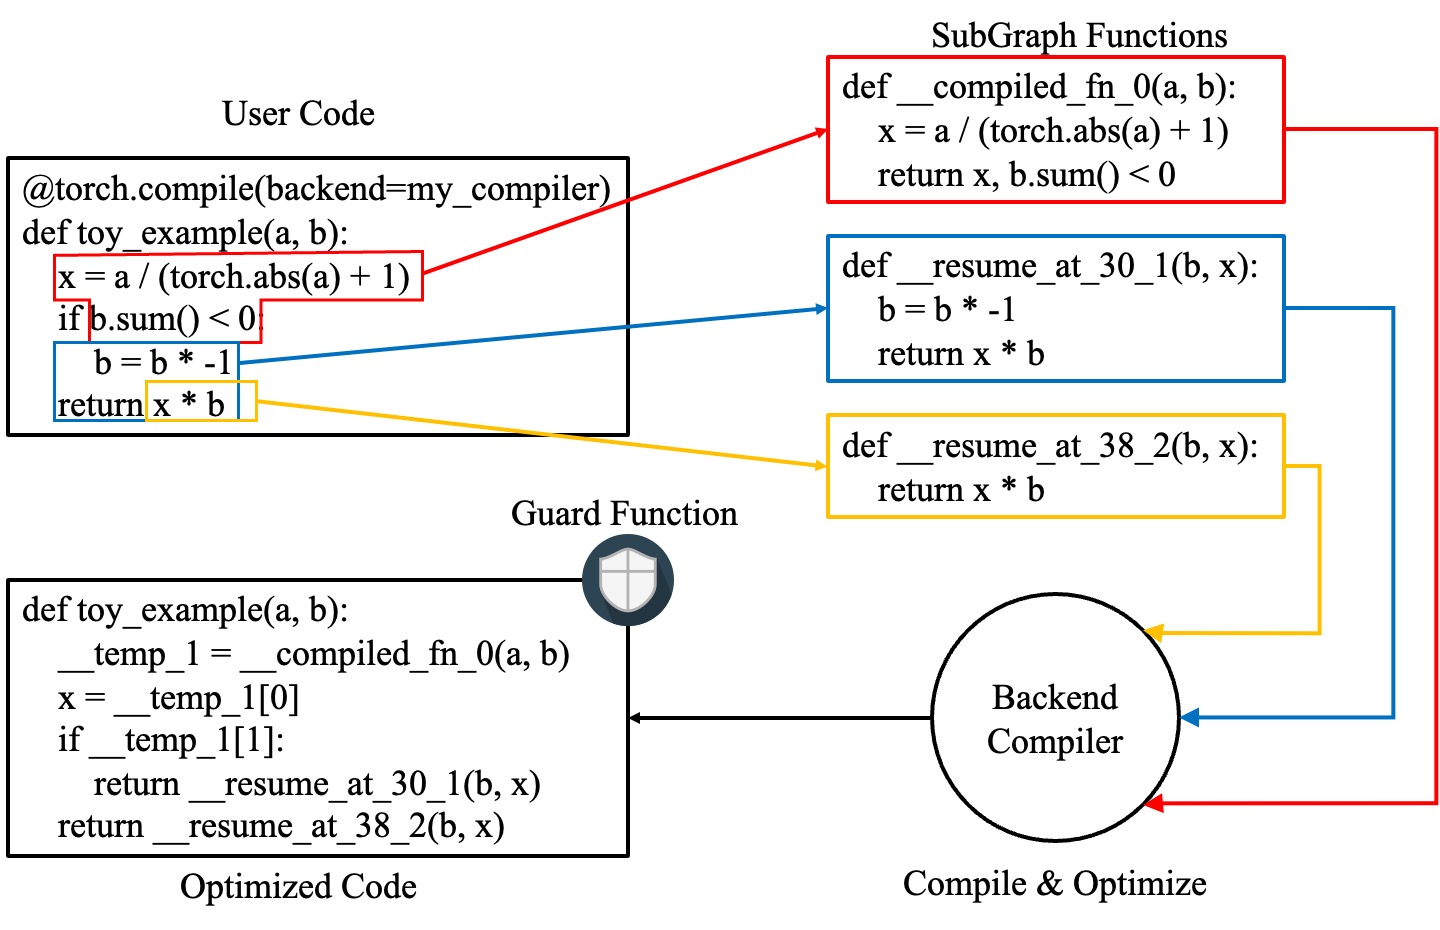
Dynamo 采用即时编译,并基于动态属性进行图优化。以下是一个使用 Dynamo 的基本示例。可以使用 torchdynamo.optimize 装饰器来装饰一个函数或方法,以启用 Dynamo 优化:
from typing import List
import torch
from torch import _dynamo as torchdynamo
def my_compiler(gm: torch.fx.GraphModule, example_inputs: List[torch.Tensor]):
    print("my_compiler() called with FX graph:")
    gm.graph.print_tabular()
    return gm.forward  # return a python callable

@torchdynamo.optimize(my_compiler)
def toy_example(a, b):
    x = a / (torch.abs(a) + 1)
    if b.sum() < 0:
        b = b * -1
    return x * b
for _ in range(100):
    toy_example(torch.randn(10), torch.randn(10))
例如,上面的第一个图中包含以下守卫:
GUARDS:
hasattr(L['a'], '_dynamo_dynamic_indices') == False
hasattr(L['b'], '_dynamo_dynamic_indices') == False
utils_device.CURRENT_DEVICE == None
___skip_backend_check() or ___current_backend() == ___lookup_backend(140355900538256)
check_tensor(L['a'], Tensor, DispatchKeySet(CPU, BackendSelect, ADInplaceOrView, AutogradCPU), torch.float32, device=None, requires_grad=False, size=[10], stride=[1])
check_tensor(L['b'], Tensor, DispatchKeySet(CPU, BackendSelect, ADInplaceOrView, AutogradCPU), torch.float32, device=None, requires_grad=False, size=[10], stride=[1])
如果那些守卫中的任何一个失败,图将被重新捕获和重新编译。其中有趣的守卫是 check_tensor ,它检查以下 torch.Tensor 属性:
张量(张量子类等)的 Python 类
数据类型
设备
需要梯度
分发键(应用了线程局部包含/排除)
维数
大小*
步长*
全专业模式允许后端编译器假设一个完全静态的图。不幸的是,大多数后端都需要这样做。在动态形状模式下,返回动态形状的操作将触发图断裂。
Dynamo 在做什么?
如果你想更好地理解 Dynamo 在做什么,你可以用以下方式运行你的代码:
TORCH_LOGS="+dynamo,guards,bytecode"
如果你不太熟悉 Python 字节码,你可以在运行代码之前添加一个反汇编钩子将字节码反汇编成可读的源代码。一个可用的工具是 depyf。如果你还没有安装 depyf ,请运行 pip install depyf 。然后,在运行任何代码之前,添加以下代码来安装反汇编钩子。
import depyf
depyf.install()
此代码触发了有用的(但垃圾信息)打印输出。
例如, toy_example 中的第一个图表的打印输出如下:
__compiled_fn_0 <eval_with_key>.1
opcode         name     target                                                  args              kwargs
-------------  -------  ------------------------------------------------------  ----------------  --------
placeholder    a        a                                                       ()                {}
placeholder    b        b                                                       ()                {}
call_function  abs_1    <built-in method abs of type object at 0x7f9ca082f8a0>  (a,)              {}
call_function  add      <built-in function add>                                 (abs_1, 1)        {}
call_function  truediv  <built-in function truediv>                             (a, add)          {}
call_method    sum_1    sum                                                     (b,)              {}
call_function  lt       <built-in function lt>                                  (sum_1, 0)        {}
output         output   output                                                  ((truediv, lt),)  {}

ORIGINAL BYTECODE toy_example example.py line 12
 14           0 LOAD_FAST                0 (a)
              2 LOAD_GLOBAL              0 (torch)
              4 LOAD_METHOD              1 (abs)
              6 LOAD_FAST                0 (a)
              8 CALL_METHOD              1
             10 LOAD_CONST               1 (1)
             12 BINARY_ADD
             14 BINARY_TRUE_DIVIDE
             16 STORE_FAST               2 (x)

 15          18 LOAD_FAST                1 (b)
             20 LOAD_METHOD              2 (sum)
             22 CALL_METHOD              0
             24 LOAD_CONST               2 (0)
             26 COMPARE_OP               0 (<)
             28 POP_JUMP_IF_FALSE       19 (to 38)

 16          30 LOAD_FAST                1 (b)
             32 LOAD_CONST               3 (-1)
             34 BINARY_MULTIPLY
             36 STORE_FAST               1 (b)

 17     >>   38 LOAD_FAST                2 (x)
             40 LOAD_FAST                1 (b)
             42 BINARY_MULTIPLY
             44 RETURN_VALUE


MODIFIED BYTECODE toy_example example.py line 12
 12           0 LOAD_GLOBAL              3 (__compiled_fn_0)
              2 LOAD_FAST                0 (a)
              4 LOAD_FAST                1 (b)
              6 CALL_FUNCTION            2
              8 UNPACK_SEQUENCE          2
             10 STORE_FAST               2 (x)
             12 POP_JUMP_IF_FALSE       12 (to 24)
             14 LOAD_GLOBAL              4 (__resume_at_30_1)
             16 LOAD_FAST                1 (b)
             18 LOAD_FAST                2 (x)
             20 CALL_FUNCTION            2
             22 RETURN_VALUE
        >>   24 LOAD_GLOBAL              5 (__resume_at_38_2)
             26 LOAD_FAST                1 (b)
             28 LOAD_FAST                2 (x)
             30 CALL_FUNCTION            2
             32 RETURN_VALUE


possible source code:
def toy_example(a, b):
    __temp_1 = __compiled_fn_0(a, b)
    x = __temp_1[0]
    if __temp_1[1]:
        return __resume_at_30_1(b, x)
    return __resume_at_38_2(b, x)

If you find the decompiled code is wrong,please submit an issue at https://github.com/youkaichao/depyf/issues.
在顶部,您可以看到 FX 图表。接下来,您可以看到函数的原始字节码,然后是 Dynamo 生成的修改后的字节码,以及供参考的反编译源代码。最后,您可以看到我们上面提到的守卫。
在修改后的字节码中, __compiled_fn_0 是 my_compiler() (编译后的图表)的返回值。 __resume_at_30_1 和 __resume_at_38_2 都是生成的延续函数,它们在图表中断(字节码偏移量 30 和 38)后继续执行。这些函数的形式如下:
__resume_at_<offset>:
    ... restore stack state if needed ...
    JUMP_ABSOLUTE <offset> into toy_example
    ... original bytecode of toy_example ...
通过生成此 resume_at 函数,我们强制函数的其余部分在新的 Python 帧中执行,这会递归地触发 Dynamo 在执行达到该点时重新启动捕获。
如何检查 Dynamo 生成的工件?
要检查 Dynamo 生成的工件,有一个 API torch._dynamo.eval_frame._debug_get_cache_entry_list 可以检索编译后的代码,并从函数的 __code__ 对象中排除出界。一个编译后的函数可以有多个缓存条目,每个缓存条目包含一个生成函数来检查守卫,以及一个 types.CodeType 对象来保存如果满足守卫条件要执行的代码。
from torch._dynamo.eval_frame import _debug_get_cache_entry_list, innermost_fn
cache_entries = _debug_get_cache_entry_list(innermost_fn(toy_example))
cache_entry = cache_entries[0]
guard, code = cache_entry.check_fn, cache_entry.code
# the guard takes the local variables of an input frame, and tells whether a re-compilation should be triggered.
import dis
dis.dis(guard)
dis.dis(code)
如果您了解 Python 字节码,您就可以理解上述输出。
对于守卫函数,无需检查字节码。我们可以直接访问其守卫条件:
for code_part in guard.code_parts:
    print(code_part)
输出结果为:
___guarded_code.valid
___check_global_state()
hasattr(L['a'], '_dynamo_dynamic_indices') == False
hasattr(L['b'], '_dynamo_dynamic_indices') == False
utils_device.CURRENT_DEVICE == None
___skip_backend_check() or ___current_backend() == ___lookup_backend(140215810860528)
___check_tensors(L['a'], L['b'], tensor_check_names=tensor_check_names)
只有当所有条件都满足时,守卫函数返回 true,编译后的代码才会执行。
对于编译后的代码,我们无法直接访问其源代码,而需要反编译。
from depyf import decompile
print(decompile(code))
输出为:
def toy_example(a, b):
    __temp_1 = __compiled_fn_0(a, b)
    x = __temp_1[0]
    if __temp_1[1]:
        return __resume_at_30_1(b, x)
    return __resume_at_38_2(b, x)
代码中引用的一些名称有:
编译后的函数存储在包含原始函数的模块的全局命名空间中
toy_example。这些包括名称如__compiled_fn_0/__resume_at_30_1/__resume_at_38_2。用于检查守卫的闭包变量。名称可以从
guard.__code__.co_freevars访问,值存储在guard.__closure__中。这些包括名称如___guarded_code/___is_grad_enabled/___are_deterministic_algorithms_enabled/___is_torch_function_enabled/utils_device/___check_tensors/tensor_check_names。函数的第 0#个参数。这是一个将
toy_example的参数名称映射到其值的字典。这仅在函数被调用时才可用,此时帧评估 API 开始发挥作用。简而言之,L是一个具有{'a': value_a, 'b': value_b}结构的dict。因此,您可以看到代码使用L['a']来引用输入变量a。
图断点在编译后的 toy_example 代码中显示,我们需要使用 Python 解释器来选择以下图进行执行。
注意,我们传递一个简单的 my_compiler 函数作为后端编译器,因此子图代码 __resume_at_38_2 、 __resume_at_30_1 和 __compiled_fn_0 仍然是 Python 代码。这也可以进行检查(请忽略函数名称,只需使用函数签名和函数体代码即可):
print("source code of __compiled_fn_0:")
print(innermost_fn(__compiled_fn_0).__self__.code)
print("=" * 60)
print("source code of __resume_at_30_1:")
print(decompile(__resume_at_30_1))
print("=" * 60)
print("source code of __resume_at_38_2:")
print(decompile(__resume_at_38_2))
source code of __compiled_fn_0:

def forward(self, L_a_ : torch.Tensor, L_b_ : torch.Tensor):
    l_a_ = L_a_
    l_b_ = L_b_
    abs_1 = torch.abs(l_a_)
    add = abs_1 + 1;  abs_1 = None
    truediv = l_a_ / add;  l_a_ = add = None
    sum_1 = l_b_.sum();  l_b_ = None
    lt = sum_1 < 0;  sum_1 = None
    return (truediv, lt)

# To see more debug info, please use ``graph_module.print_readable()``
============================================================
source code of __resume_at_30_1:
def <resume in toy_example>(b, x):
    b = b * -1
    return x * b

============================================================
source code of __resume_at_38_2:
def <resume in toy_example>(b, x):
    return x * b
然而,如果我们使用其他后端,如内置的 inductor ,子图代码将被编译为 GPU 的 CUDA 内核或 CPU 的 C++代码。
总结来说,编译后的代码在概念上等同于以下代码:
def compiled_example(a, b):
    L = {'a': a, 'b': b}
    for guard, code in get_cache_entries():
        if guard(L):
            return code(a, b)
    recompile_and_add_another_cache_entry()
以下图表展示了如何通过 torch.compile 转换和优化用户编写的代码:它首先从用户编写的函数中提取计算图,然后将这些图编译成优化的函数,最后将它们组装成一个新的函数,该函数在功能上等同于用户编写的代码,但优化了计算速度。
想了解更多关于这些功能是如何在内部实现的,请参阅 Dynamo 深度解析。